Difference between pages "Install a printer windows xp" and "Installing Office 2013 (Faculty/Staff only)"
(Difference between pages)
m (1 revision imported) |
en>Helpdesk |
||
| Line 1: | Line 1: | ||
| − | + | == Installing Office 2013 == | |
| − | + | *Requirements: You must be running the Windows 7 operating system and connected on-campus prior to starting this installation | |
| − | |||
| − | + | '''If you are running Windows 7, are on-campus and logged into any of our networks you should be able to install Office 2013 by following the steps below.''' | |
| − | [[Image: | + | *Click the "Start" button. |
| + | *Select 'Computer' from the start menu | ||
| + | *Click the 'S:' drive labeled 'groupshare.mcla.edu (S:) | ||
| + | *Select the folder 'updates' | ||
| + | *Select the folder 'Office2013' | ||
| + | *Open 'setup.exe' | ||
| + | *Click '''Yes''' to the User Account Control prompt which warns you '''"this file is from an untrusted location"'''. | ||
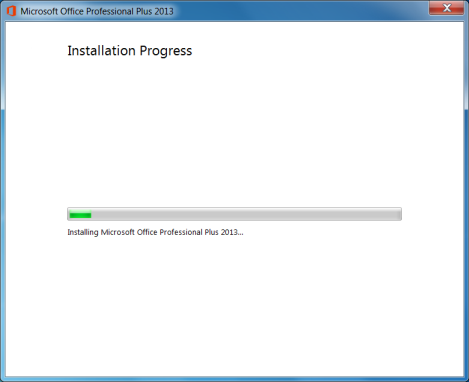
| + | *The Installation Progress dialog box should now be displayed. | ||
| + | [[Image:O13up3.png]] | ||
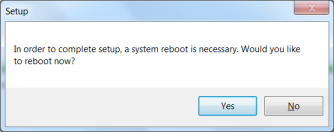
| + | *Once the installation is finished, you may be prompted to reboot your system. | ||
| + | [[Image:O13up4.png]] | ||
| + | *After system reboot, installation is finished and Office 2013 programs are ready to use. | ||
| − | + | == Want to configure Outlook 2013 after you complete the Office 2013 installation? == | |
| − | + | If you are interested in configuring Outlook 2013 which is part of this installation, please refer to: | |
| − | + | *[[Configuring Outlook 2013]] | |
| − | |||
| − | |||
| − | |||
| − | |||
| − | |||
| − | |||
| − | [[ | ||
| − | |||
| − | |||
| − | |||
| − | |||
| − | |||
| − | |||
| − | |||
| − | |||
| − | |||
| − | |||
Revision as of 17:01, 22 October 2015
Installing Office 2013
- Requirements: You must be running the Windows 7 operating system and connected on-campus prior to starting this installation
If you are running Windows 7, are on-campus and logged into any of our networks you should be able to install Office 2013 by following the steps below.
- Click the "Start" button.
- Select 'Computer' from the start menu
- Click the 'S:' drive labeled 'groupshare.mcla.edu (S:)
- Select the folder 'updates'
- Select the folder 'Office2013'
- Open 'setup.exe'
- Click Yes to the User Account Control prompt which warns you "this file is from an untrusted location".
- The Installation Progress dialog box should now be displayed.
- Once the installation is finished, you may be prompted to reboot your system.
- After system reboot, installation is finished and Office 2013 programs are ready to use.
Want to configure Outlook 2013 after you complete the Office 2013 installation?
If you are interested in configuring Outlook 2013 which is part of this installation, please refer to:

