Difference between pages "O365 - OneDrive in Office 365" and "O365 - Organizing E-mail"
m (1 revision imported) |
en>Helpdesk |
||
| Line 1: | Line 1: | ||
| − | + | '''''Documentation Source: Microsoft.com''''' | |
| − | |||
| − | + | Create Inbox rules in Outlook Web App to automatically perform specific actions on messages as they arrive, based on your criteria. For example, you can create a rule to automatically move all mail sent to a group you're a member of to a specific folder. | |
| − | |||
| − | |||
| − | |||
| − | + | If you want to create and manage inbox rules in the Outlook desktop program, see Manage email messages by using rules. | |
| − | + | To manage rules, click the gear icon > Options > Organize Email > Inbox Rules. | |
| − | + | ==What you’ll see on the Inbox Rules tab== | |
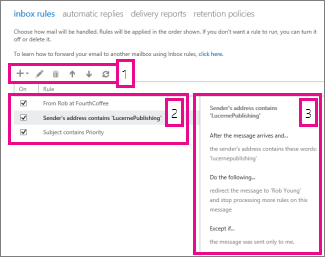
| − | + | The Inbox Rules tab shows you an overview of all your Inbox rules. From here, you can review what a rule does, turn rules off or on, create new rules, edit existing rules, or delete rules that you no longer need. | |
| − | + | [[Image:Image002_o365_07.png]] | |
| − | |||
| − | |||
| − | |||
| − | |||
| + | #Settings used to manage inbox rules. | ||
| + | #Rules are processed in the order listed. | ||
| + | #The information pane shows a summary of the criteria and actions for the selected rule. | ||
| − | + | [[Image:Imagemod1_o365_07.png]] | |
| − | + | ==How do I create a new rule?== | |
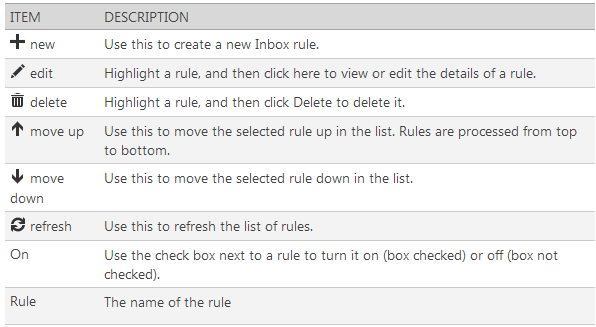
| − | + | To create a new blank rule using the Inbox Rules tab, choose new. | |
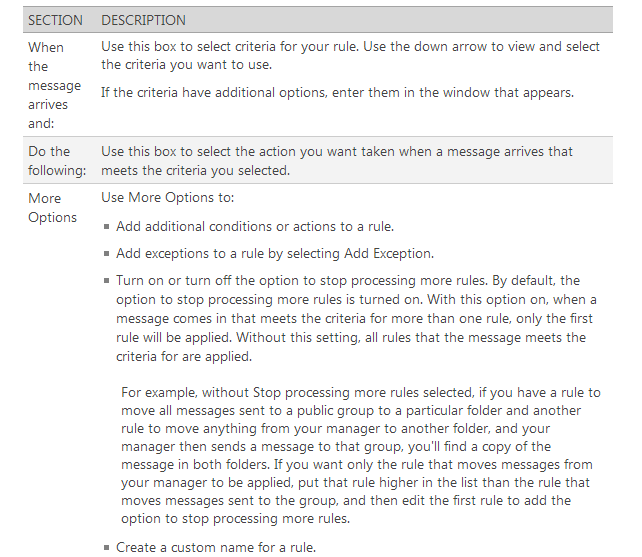
| − | + | The new rule window has three sections: | |
| − | |||
| − | + | [[Image:Imagemod2_o365_07.png]] | |
| − | |||
| − | |||
| − | |||
| − | |||
| − | |||
| − | == | + | ==How do I edit a rule?== |
| − | + | You can edit any rule by selecting it and choosing edit to open the rule so that you can change the conditions or actions of the rule. | |
| − | |||
| − | |||
| − | |||
| − | |||
| − | |||
| − | == | + | ==How do I delete a rule?== |
| − | + | If you have a rule that you no longer want, you can select it and then click delete to remove it. If you just want to turn the rule off for a while, remove the check mark next to the rule. | |
| − | |||
| − | + | ==What else do I need to know?== | |
| + | *When you create a new rule in Outlook Web App, you may receive a warning that some rules that were created in Outlook and are currently disabled will be deleted. Before you delete those rules, you may want to sign in to your account using Outlook and check the rules to see if you want to keep them. Enable any rules you want to keep. | ||
| + | *Rules are run from top to bottom in the order in which they appear in the Rules window. To change the order of rules, click the rule you want to move, and then click the up or down arrow to move the rule to the position you want in the list. | ||
| + | *Some types of messages won't trigger Inbox rules, including: | ||
| + | *Delivery status notifications, which include non-delivery reports and system messages. | ||
| + | *Read receipts and delivery receipts that are generated by an e-mail client. | ||
| + | *Some automatic-reply (Out of Office) messages. | ||
| + | *You don't have to use the Inbox Rules tab to create a rule. You can also create rules directly from messages. To create a rule directly from a message: | ||
| + | *Right-click the message in the message list pane, then click Create Rule. | ||
| + | *Or while you view the message in the reading pane, select the extended menu and then choose Create Rule from the menu. | ||
| + | *Each rule you create will take up space in a hidden section of your mailbox. This section is limited to 64 KB. The actual amount of space a rule uses depends on several factors, such as how long the name is and how many conditions you've applied. When you reach the 64 KB limit, you'll be warned that you can't create any more rules. If that happens, you'll have to delete or simplify some of your existing rules before you can create more. Some ways you can reduce the space used by rules are: | ||
| + | *Delete rules you no longer need. | ||
| + | *Shorten the names of your rules. | ||
| + | *Combine one or more rules that do the same thing. | ||
| + | *Remove criteria from rules. | ||
| + | *When you create a forwarding rule, you can add more than one address to forward to. The number of addresses you can forward to may be limited, depending on the settings for your account. If you add more addresses than are allowed, your forwarding rule won’t work. If you create a forwarding rule with more than one address, test it to be sure it works. | ||
| − | + | '''''Documentation Source: Microsoft.com''''' | |
| − | |||
| − | |||
| − | |||
| − | |||
| − | |||
| − | |||
| − | |||
| − | |||
| − | |||
| − | |||
| − | |||
| − | |||
| − | |||
| − | |||
| − | |||
| − | |||
| − | |||
| − | |||
| − | |||
| − | |||
| − | |||
| − | |||
| − | |||
| − | |||
| − | |||
| − | |||
| − | |||
| − | |||
| − | |||
| − | |||
| − | |||
| − | |||
| − | |||
| − | |||
| − | |||
| − | |||
| − | |||
| − | |||
| − | |||
| − | |||
| − | |||
| − | |||
| − | |||
| − | |||
| − | |||
| − | |||
| − | |||
| − | |||
| − | |||
| − | |||
| − | |||
| − | |||
| − | |||
| − | |||
| − | |||
| − | |||
| − | |||
| − | |||
| − | |||
| − | |||
| − | |||
| − | |||
| − | |||
| − | |||
| − | |||
| − | |||
Revision as of 23:50, 14 July 2014
Documentation Source: Microsoft.com
Create Inbox rules in Outlook Web App to automatically perform specific actions on messages as they arrive, based on your criteria. For example, you can create a rule to automatically move all mail sent to a group you're a member of to a specific folder.
If you want to create and manage inbox rules in the Outlook desktop program, see Manage email messages by using rules.
To manage rules, click the gear icon > Options > Organize Email > Inbox Rules.
Contents
What you’ll see on the Inbox Rules tab
The Inbox Rules tab shows you an overview of all your Inbox rules. From here, you can review what a rule does, turn rules off or on, create new rules, edit existing rules, or delete rules that you no longer need.
- Settings used to manage inbox rules.
- Rules are processed in the order listed.
- The information pane shows a summary of the criteria and actions for the selected rule.
How do I create a new rule?
To create a new blank rule using the Inbox Rules tab, choose new. The new rule window has three sections:
How do I edit a rule?
You can edit any rule by selecting it and choosing edit to open the rule so that you can change the conditions or actions of the rule.
How do I delete a rule?
If you have a rule that you no longer want, you can select it and then click delete to remove it. If you just want to turn the rule off for a while, remove the check mark next to the rule.
What else do I need to know?
- When you create a new rule in Outlook Web App, you may receive a warning that some rules that were created in Outlook and are currently disabled will be deleted. Before you delete those rules, you may want to sign in to your account using Outlook and check the rules to see if you want to keep them. Enable any rules you want to keep.
- Rules are run from top to bottom in the order in which they appear in the Rules window. To change the order of rules, click the rule you want to move, and then click the up or down arrow to move the rule to the position you want in the list.
- Some types of messages won't trigger Inbox rules, including:
- Delivery status notifications, which include non-delivery reports and system messages.
- Read receipts and delivery receipts that are generated by an e-mail client.
- Some automatic-reply (Out of Office) messages.
- You don't have to use the Inbox Rules tab to create a rule. You can also create rules directly from messages. To create a rule directly from a message:
- Right-click the message in the message list pane, then click Create Rule.
- Or while you view the message in the reading pane, select the extended menu and then choose Create Rule from the menu.
- Each rule you create will take up space in a hidden section of your mailbox. This section is limited to 64 KB. The actual amount of space a rule uses depends on several factors, such as how long the name is and how many conditions you've applied. When you reach the 64 KB limit, you'll be warned that you can't create any more rules. If that happens, you'll have to delete or simplify some of your existing rules before you can create more. Some ways you can reduce the space used by rules are:
- Delete rules you no longer need.
- Shorten the names of your rules.
- Combine one or more rules that do the same thing.
- Remove criteria from rules.
- When you create a forwarding rule, you can add more than one address to forward to. The number of addresses you can forward to may be limited, depending on the settings for your account. If you add more addresses than are allowed, your forwarding rule won’t work. If you create a forwarding rule with more than one address, test it to be sure it works.
Documentation Source: Microsoft.com


