Difference between pages "File:Copyloginguest.jpg" and "Guest Printing"
(Difference between pages)
(→Step 4. Release Print Jobs at BlazerPrint Copier) |
|||
| Line 1: | Line 1: | ||
| − | + | Users visiting MCLA can also use BlazerPrint copiers by creating BlazerPrint guest accounts, applying print credits to the accounts and using them to print from their devices. Follow these steps: | |
| + | |||
| + | ==Step 1. Create a BlazerPrint Guest Account== | ||
| + | *Connect your device to the BlazerNet wireless network. | ||
| + | *Open the [http://papercut:9191/ New User Registration page here] | ||
| + | *Fill out the form to create a BlazerPrint guest user account | ||
| + | |||
| + | ==Step 2. Add Credits to the BlazerPrint Guest Account== | ||
| + | *Login to [http://papercut:9191/ BlazerPrint Portal located here] with the BlazerPrint guest account. | ||
| + | *Click on 'Add Credits'. | ||
| + | *Select the Amount and click 'Add Funds'. | ||
| + | *Complete the PayPal payment process. | ||
| + | |||
| + | ==Step 3. Connect your device to BlazerPrint== | ||
| + | *Follow [[Connecting your personally owned device to BlazerPrint (Students)|these instructions]] to connect your device to the BlazerPrint printer queue. | ||
| + | *When asked to log in to BlazerPrint, enter your BlazerPrint guest username and password | ||
| + | |||
| + | ==Step 4. Release Print Jobs at BlazerPrint Copier== | ||
| + | *1. Login to the copier by pressing the keyboard icon in the top right corner of the copier's touchscreen. | ||
| + | [[File:Copyloginguest.jpg|200px]] | ||
| + | *2. Enter the BlazerPrint Guest username and password - hit the 'OK' button after each screen. | ||
| + | *3. Select ‘Print Release” from Home Screen | ||
| + | [[image:release1.jpg|400px]] | ||
| + | *4. A list of all print jobs will appear. Select which jobs you would like to print by either checking or unchecking the box to the left of the filename | ||
| + | [[image:release2.jpg|400px]] | ||
| + | *5. To edit the print settings of each job, Select the Arrow to the right of the filename | ||
| + | [[image:release4.jpg|400px]] | ||
| + | *6. Once all print jobs have been selected, Click “Print” | ||
| + | [[image:release5.jpg|400px]] | ||
Revision as of 03:38, 10 February 2023
Users visiting MCLA can also use BlazerPrint copiers by creating BlazerPrint guest accounts, applying print credits to the accounts and using them to print from their devices. Follow these steps:
Contents
Step 1. Create a BlazerPrint Guest Account
- Connect your device to the BlazerNet wireless network.
- Open the New User Registration page here
- Fill out the form to create a BlazerPrint guest user account
Step 2. Add Credits to the BlazerPrint Guest Account
- Login to BlazerPrint Portal located here with the BlazerPrint guest account.
- Click on 'Add Credits'.
- Select the Amount and click 'Add Funds'.
- Complete the PayPal payment process.
Step 3. Connect your device to BlazerPrint
- Follow these instructions to connect your device to the BlazerPrint printer queue.
- When asked to log in to BlazerPrint, enter your BlazerPrint guest username and password
Step 4. Release Print Jobs at BlazerPrint Copier
- 1. Login to the copier by pressing the keyboard icon in the top right corner of the copier's touchscreen.

- 2. Enter the BlazerPrint Guest username and password - hit the 'OK' button after each screen.
- 3. Select ‘Print Release” from Home Screen

- 4. A list of all print jobs will appear. Select which jobs you would like to print by either checking or unchecking the box to the left of the filename

- 5. To edit the print settings of each job, Select the Arrow to the right of the filename

- 6. Once all print jobs have been selected, Click “Print”

File history
Click on a date/time to view the file as it appeared at that time.
| Date/Time | Thumbnail | Dimensions | User | Comment | |
|---|---|---|---|---|---|
| current | 03:35, 10 February 2023 | 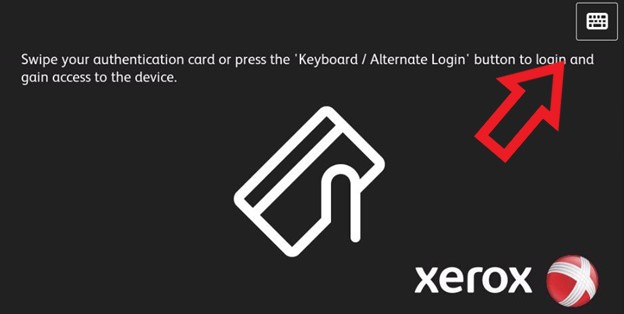 | 624 × 314 (24 KB) | A10001222 (talk | contribs) |
- You cannot overwrite this file.
File usage
The following page links to this file: