|
en>Helpdesk |
| Line 1: |
Line 1: |
| − | ==Manage Skype for Business Meetings==
| + | To manually install an MCLA printer on macOS Sierra, these steps may be followed: |
| − | The Skype for Business default options are appropriate for small and casual meetings with coworkers. It’s a good idea to change the options if you are inviting more than 10 to 15 people, want to control meeting permissions, or have invitees from other companies.
| |
| | | | |
| − | If you use Outlook, you can change options for all Skype for Business meetings that you set up by clicking New Skype for Business Meeting in your Outlook Calendar, clicking Meeting Options on the ribbon, and then selecting the options you want to use.
| + | Open System Preferences and click on '''Printers & Scanners''' |
| | | | |
| − | [[File:Skypemeetingoptions.png]] | + | [[Image:macmanual1.png]] |
| | | | |
| − | ===These people don’t have to wait in the lobby===
| + | Click the '''+''' button to open the Add dialogue box |
| | | | |
| − | You decide who gets into the meeting directly and who has to wait for you to let them in. If you have people wait, when the meeting starts, you’ll see a list of people who are waiting and can grant or deny access.
| + | [[Image:macmanual2.png]] |
| | | | |
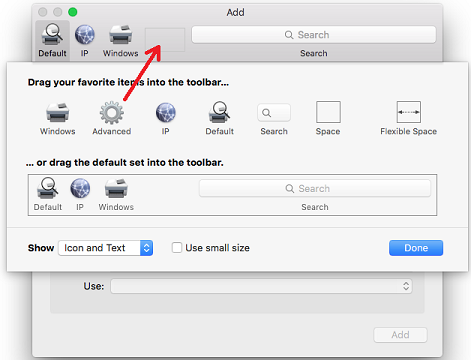
| | + | Once in the Add dialogue, control click or right click in the toolbar area and click '''Customize Toolbar...''' |
| | | | |
| − | {|class="wikitable"
| + | [[Image:macmanual3.png]] |
| − | !Who gets in directly?
| |
| − | !What happens
| |
| − | !Recommended when…
| |
| − | |-
| |
| − | |The meeting organizer||You are the only one who gets into the meeting directly. Everyone else has to wait until admitted.||You have a high security meeting and confidential information.
| |
| − | |-
| |
| − | |People I invite||Only people who were invited to the meeting join the meeting directly. Everyone else has to wait until admitted. ||You’re discussing confidential information and want to allow only specific people to join.
| |
| − | |-
| |
| − | |Anyone from my organization|Anyone from your organization can get in to the meeting directly, even if not invited.||You don’t have external participants and you are not discussing confidential information.
| |
| − | |-
| |
| − | |Anyone (no restrictions)||Anyone who has access to the meeting link gets in to the meeting directly.||You’re inviting outside participants, and you’re not discussing confidential information.
| |
| − | |}
| |
| | | | |
| − | ===Who is a presenter?===
| + | Click and drag the '''Advanced''' icon into the toolbar and click '''Done'''. |
| | | | |
| − | Here you can choose who gets to be a presenter in your meeting. Remember that all presenters have full control over the meeting and can share content, record the meeting, change the meeting options, mute people, and so on.
| + | [[Image:macmanual4.png]] |
| | | | |
| − | {|class="wikitable"
| + | Click the '''Advanced''' icon in the toolbar. You can now configure the printer you wish to install. |
| − | !Who presents?
| + | |
| − | !What happens
| + | '''Type''' should be '''Windows printer via spoolss''' |
| − | !Recommended when...
| + | |
| − | |-
| + | '''URL''' should be '''smb://printing2/''' followed by the name of the printer. |
| − | |Anyone from my organization||Anyone from your organization can be a presenter.||Suitable for casual meetings with your teammates, where all participants can share and modify content.
| + | Some examples are: |
| − | |-
| + | |
| − | |Anyone (no restrictions)||Everyone you invite can be a presenter.||Use when you have external participants and want them to present.
| + | smb://printing2/Murdock-Lab-Hallway |
| − | |-
| + | |
| − | |People scheduled as presenters||You and the people you choose can be a presenter.||Use when you want specific people to be presenters.
| + | smb://printing2/Freel_1st_Floor_Circulation |
| − | |-
| + | |
| − | |}
| + | smb://printing2/Freel-SecondFloor |
| − | Note: When you select People I choose, click Choose Presenters, and then move the participants from the Attendee to Presenters side. External invitees and distribution lists can’t be added as presenters, but you can give presenter permission to individuals when you are in the meeting.
| + | |
| | + | smb://printing2/CSI_120_Laser |
| | + | |
| | + | smb://printing2/CSI_218_Laser |
| | + | |
| | + | smb://printing2/CSI_316_Laser |
| | + | |
| | + | smb://printing2/CSI_308_Laser |
| | + | |
| | + | |
| | + | |
| | + | '''Name''' should be the name of the printer. |
| | + | |
| | + | '''Use''' should be '''Generic PostScript Printer''' |
| | + | |
| | + | Once finished, click '''Add'''. |
| | + | |
| | + | [[Image:macmanual5.png]] |
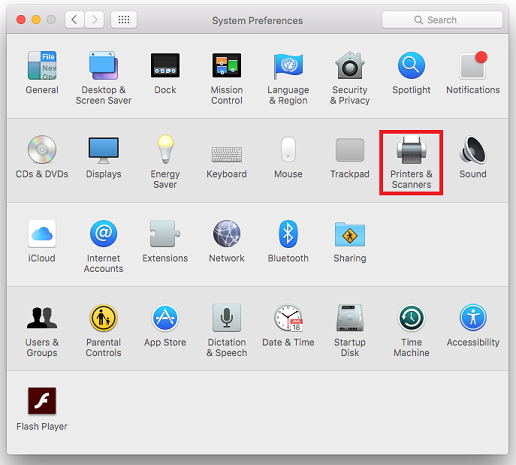
To manually install an MCLA printer on macOS Sierra, these steps may be followed:
Open System Preferences and click on Printers & Scanners
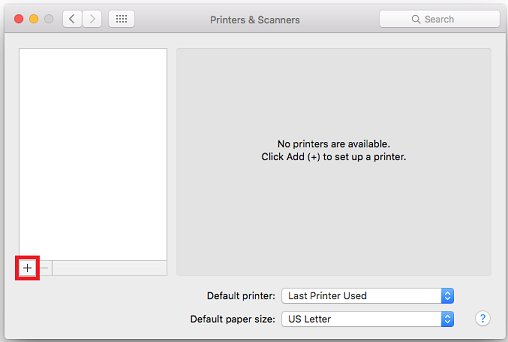
Click the + button to open the Add dialogue box
Once in the Add dialogue, control click or right click in the toolbar area and click Customize Toolbar...
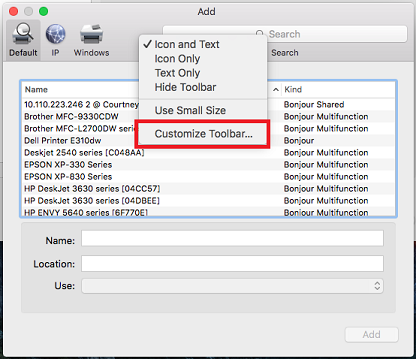
Click and drag the Advanced icon into the toolbar and click Done.
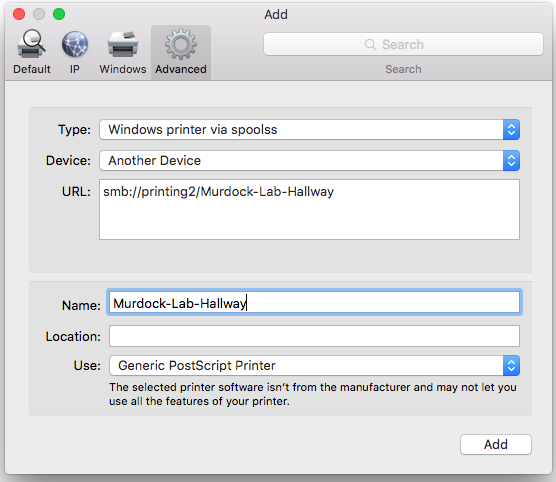
Click the Advanced icon in the toolbar. You can now configure the printer you wish to install.
Type should be Windows printer via spoolss
URL should be smb://printing2/ followed by the name of the printer.
Some examples are:
smb://printing2/Murdock-Lab-Hallway
smb://printing2/Freel_1st_Floor_Circulation
smb://printing2/Freel-SecondFloor
smb://printing2/CSI_120_Laser
smb://printing2/CSI_218_Laser
smb://printing2/CSI_316_Laser
smb://printing2/CSI_308_Laser
Name should be the name of the printer.
Use should be Generic PostScript Printer
Once finished, click Add.