Difference between pages "Install a Printer" and "Install a Printer on Mac OS"
(Difference between pages)
m (1 revision imported) |
en>StuHelpDesk |
||
| Line 1: | Line 1: | ||
| − | + | *Click the Apple drop down menu located on the top left corner of your screen and select ‘System Preferences’ | |
| − | + | *Select ‘Printers & Scanners’ | |
| − | + | *In the list of printers, remove any current network printers you are connected to by selecting the printer and clicking the ‘-‘ symbol near the bottom. | |
| − | * | + | *Once you have removed all network printers from the list, download the following .dmg file from: **http://techhelp.mcla.edu/tools/installers/MacPrinterInstaller.dmg |
| − | + | *Once downloaded, open the MacPrinterInstaller.dmg file. | |
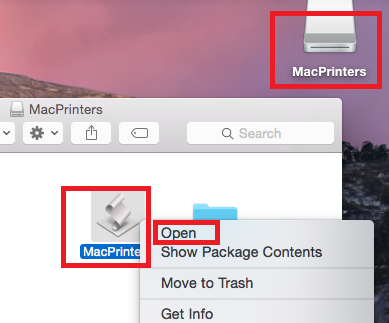
| − | + | *You will see the ‘MacPrinters’ icon appear on your desktop, double click on this drive and open it. | |
| − | + | *Hold the control key down and click on MacPrinters file located within the MacPrinter drive. Select the ‘Open’ option on the menu that appears. | |
| − | + | **[[Image:Mac03.png]] | |
| − | + | *Click ‘Open’ on the security dialog box (if shown) | |
| − | + | *Click on Apple script icon located in the dock | |
| − | + | **[[Image:Mac04.png]] | |
| − | + | *Enter your MCLA User name | |
| − | * | + | *Enter your password |
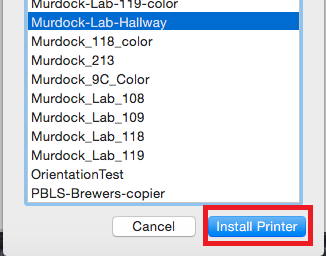
| − | + | *Select the printer you would like to connect to from the list of printers that appear. Once selected, click on ‘Install Printer’. | |
| − | [[Image: | + | **[[Image:Mac05.png]] |
| − | + | *A confirmation about the printer you would like installed will display, click ‘Proceed’ to continue with installation. | |
| − | + | *The new printer will now appear in the Printers & Scanner screen. Double chick on the printer to display the printer queue. | |
| − | * | + | *Click the ‘Printer’ menu option at the top and select ‘Print Test Page’ |
| − | + | *The ‘testprint’ job will indicate ‘Hold for Authentication’, click the ‘resume’ option which is specified by the following icon: | |
| − | [[Image: | + | **[[Image:Mac06.png]] |
| − | + | *You will be asked to enter your A number and password. Click the option checkbox ‘Remember this password in my keychain’ and select ‘OK’ | |
| − | + | *Confirm the test job has printed on the printer. | |
| − | |||
| − | [[Image: | ||
| − | |||
| − | |||
| − | * | ||
| − | * | ||
| − | |||
| − | * | ||
| − | |||
| − | * | ||
| − | |||
| − | |||
| − | [[Image: | ||
| − | |||
| − | |||
| − | |||
| − | |||
| − | |||
Revision as of 16:16, 9 August 2016
- Click the Apple drop down menu located on the top left corner of your screen and select ‘System Preferences’
- Select ‘Printers & Scanners’
- In the list of printers, remove any current network printers you are connected to by selecting the printer and clicking the ‘-‘ symbol near the bottom.
- Once you have removed all network printers from the list, download the following .dmg file from: **http://techhelp.mcla.edu/tools/installers/MacPrinterInstaller.dmg
- Once downloaded, open the MacPrinterInstaller.dmg file.
- You will see the ‘MacPrinters’ icon appear on your desktop, double click on this drive and open it.
- Hold the control key down and click on MacPrinters file located within the MacPrinter drive. Select the ‘Open’ option on the menu that appears.
- Click ‘Open’ on the security dialog box (if shown)
- Click on Apple script icon located in the dock
- Enter your MCLA User name
- Enter your password
- Select the printer you would like to connect to from the list of printers that appear. Once selected, click on ‘Install Printer’.
- A confirmation about the printer you would like installed will display, click ‘Proceed’ to continue with installation.
- The new printer will now appear in the Printers & Scanner screen. Double chick on the printer to display the printer queue.
- Click the ‘Printer’ menu option at the top and select ‘Print Test Page’
- The ‘testprint’ job will indicate ‘Hold for Authentication’, click the ‘resume’ option which is specified by the following icon:
- You will be asked to enter your A number and password. Click the option checkbox ‘Remember this password in my keychain’ and select ‘OK’
- Confirm the test job has printed on the printer.


