Difference between revisions of "O365 - Tasks Overview"
en>Helpdesk |
m (1 revision imported) |
(No difference)
| |
Latest revision as of 19:28, 27 January 2021
Documentation Source: Microsoft.com
Use your Tasks folder to keep track of things that you need to do but don’t necessarily want to put on your calendar.
An overview of tasks in Outlook Web App
Contents
What you’ll see in Tasks
In addition to tasks that you create, any message that you flag will appear in the Tasks folder.
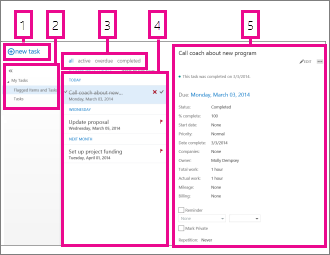
- Create a new task by clicking new.new task.
- Use this column to view Flagged items and Tasks, or just Tasks.
- Filters. Select the filter depending on what items you want to see. Tasks and flagged items that don’t have a date associated with them and that aren’t completed will appear only when you select all.
- List of items that meet the current filter criteria. Click any item to view it in the reading pane. You can use the controls in the list view to make changes to an item’s status. For example, you can mark a task as complete or remove a flag from a message.
- The reading pane, where the content of the items you’ve selected is displayed. You can use the controls in the upper corner to make changes to the item if it’s a task. If it’s a message, the controls will be the same as you would see while reading your mail.
Open a task in a separate window
By default, you read and create tasks in the reading pane, but that isn’t always what you need. Sometimes you need to be able to view or edit a task in a separate window.
When you’re creating a new task or editing an existing one, you can pop it out into a new window by clicking the pop out icon ![]() in the upper corner of the message.
in the upper corner of the message.
To open a task that you’re viewing in a separate window, click the extended menu icon ![]() and select open in separate window.
and select open in separate window.
The tasks list
Tasks includes tasks that you’ve created and messages that have been flagged.
- You can switch between viewing Flagged Items and Tasks and just Tasks by using the folder list.
- You can further choose which items to view by using the filters at the top of the task list: all, active, overdue, and completed.
- You can use icons in the task list to complete some quick tasks. Click
 to delete a task. Click
  or
or  to mark a task as completed. To mark a completed task as not completed, click
  . To change the date associated with a flag or mark the item complete, right-click it.
Creating tasks
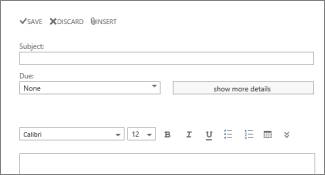
To create a new task, click ![]() new task. This will open a simple task form in the reading pane.
new task. This will open a simple task form in the reading pane.
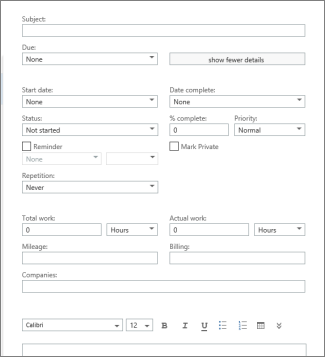
If you want to have more details, click show more details.
When you’re done, click ![]() Save to save your changes or
Save to save your changes or ![]() Discard to cancel.
Discard to cancel.
Editing tasks
To edit a task, select it in the list view, and then click ![]() Edit in the reading pane. When you’re done, click
Edit in the reading pane. When you’re done, click ![]() Save to save your changes or
Save to save your changes or ![]() Discard to cancel.
Discard to cancel.
Flagged messages will appear just as they would if you were viewing your Mail. You can respond to them from within Tasks. You can change their flag status by right-clicking the ![]() flag in the Task list and then clicking the value you want.
flag in the Task list and then clicking the value you want.
When you edit a task, you can click the More menu ![]() to see more things you can do. Click it to see options to delete, add a category, or mark the task as complete.
to see more things you can do. Click it to see options to delete, add a category, or mark the task as complete.
Documentation Source: Microsoft.com


