Difference between pages "Bowman 315 Mac Lab" and "Connecting your personally owned device to BlazerPrint (Students)"
(Difference between pages)
en>Helpdesk |
(→For IOS Users (Iphone/Ipad):) |
||
| Line 1: | Line 1: | ||
| − | The | + | The following instructions will walk you through the process of setting up the 'BlazerPrint' virtual printer queue on your personally-owned laptop. Once set up, you can send print jobs to the queue and release them from any BlazerPrint copier on campus. |
| − | + | '''NOTE: These instructions are designed for personally owned devices. MCLA Faculty/Staff who are using MCLA-owned devices should review these instructions instead.''' | |
| − | + | <youtube>j0LHSuG-Ewo</youtube> | |
| − | |||
| − | |||
| − | |||
| − | |||
| − | |||
| − | |||
| − | |||
| − | |||
| − | == | + | =For Windows Users:= |
| − | * | + | *1. Ensure your laptop is connected to the oncampus MCLA network, preferably Eduroam. |
| − | * | + | *2. Download the Mobility Print Installer located [https://papercut.com/products/ng/mobility-print/download/client/windows/ here]. |
| − | * | + | *3. Run the installer once fully downloaded. |
| − | * | + | *4. Windows prompt will ask you for permission to make changes to your computer; Click “Yes” |
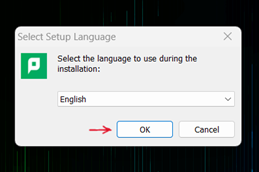
| − | * | + | *5. Select a language, then click “Ok” |
| − | * | + | [[image:mobility1.png]] |
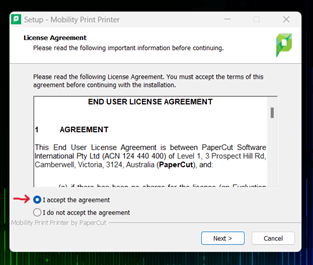
| − | * | + | *6. Click “I accept the agreement” then click “Next” |
| − | * | + | [[image:mobility2.png]] |
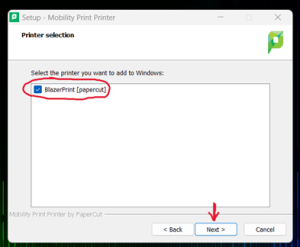
| − | * | + | *7. “BlazerPrint” should appear in the list of printers. Select “BlazerPrint”, then click “Next” |
| − | + | [[image:mobility3.png|300px]] | |
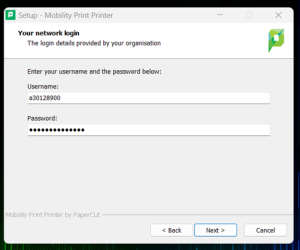
| − | + | *8. Sign in using your A number and password, then click “Next” | |
| − | * | + | [[image:mobility4.png|300px]] |
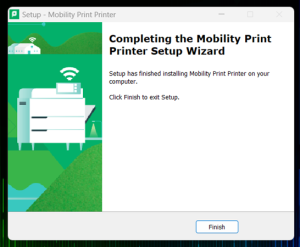
| − | * | + | *9. If done successfully, a page will appear saying that the Mobility Print Setup has been installed. Click “Finish” |
| − | * | + | [[image:mobility5.png|300px]] |
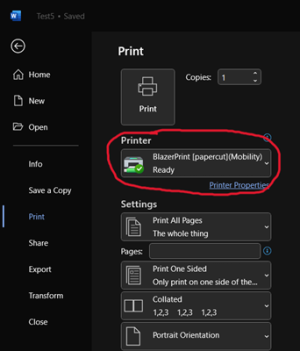
| − | * | + | *10. BlazerPrint should now appear in the list of printers when attempting to print |
| − | * | + | [[image:mobility6.png|300px]] |
| − | * | + | |
| − | * | + | =For Mac OS Users:= |
| − | * | + | |
| − | * | + | *1. Ensure your laptop is connected to the oncampus MCLA network, preferably Eduroam. |
| − | + | *2. Navigate to System Preferences > Printers and Scanners. | |
| − | + | *3. Click the ‘retry’ icon under the Printers List. The Add dialog is displayed. It displays a list of all of the discovered printers on the network. | |
| − | + | *4. Select a "BlazerPrint' printer that uses the Bonjour protocol. | |
| − | * | + | *5. At the bottom of the dialog box, check that Use is set to Secure AirPrint. |
| − | + | **'''Note:''' If Secure AirPrint isn’t displayed, close the add dialog then disconnect from the network. Reconnect to it again. | |
| − | + | *6. Click Add. | |
| − | * | + | *7. Print your document. When prompted, enter your MCLA A number and password. |
| − | + | ||
| − | + | =For IOS Users (Iphone/Ipad):= | |
| − | + | ||
| − | + | *1. Open the app you want to print from and tap the share icon: | |
| − | + | [[File:Shareiosprint.png|100px]] | |
| − | + | ||
| − | + | *Scroll down and tap | |
| − | + | [[File:Print-icon.png|100px]] | |
| − | + | or | |
| − | + | Print. | |
| − | + | No print option? Check the app's User Guide or Help - not all apps support printing. | |
| + | |||
| + | Select a printer. | ||
| + | Select the number of copies and other options, like which pages you want to print. | ||
| + | Tap Print in the top-right corner. | ||
| + | If you're prompted, enter your MCLA A number and password. | ||
| + | |||
| + | =For ChromeBook Users:= | ||
Revision as of 00:47, 10 February 2023
The following instructions will walk you through the process of setting up the 'BlazerPrint' virtual printer queue on your personally-owned laptop. Once set up, you can send print jobs to the queue and release them from any BlazerPrint copier on campus.
NOTE: These instructions are designed for personally owned devices. MCLA Faculty/Staff who are using MCLA-owned devices should review these instructions instead.
Contents
For Windows Users:
- 1. Ensure your laptop is connected to the oncampus MCLA network, preferably Eduroam.
- 2. Download the Mobility Print Installer located here.
- 3. Run the installer once fully downloaded.
- 4. Windows prompt will ask you for permission to make changes to your computer; Click “Yes”
- 5. Select a language, then click “Ok”
- 6. Click “I accept the agreement” then click “Next”
- 7. “BlazerPrint” should appear in the list of printers. Select “BlazerPrint”, then click “Next”
- 8. Sign in using your A number and password, then click “Next”
- 9. If done successfully, a page will appear saying that the Mobility Print Setup has been installed. Click “Finish”
- 10. BlazerPrint should now appear in the list of printers when attempting to print
For Mac OS Users:
- 1. Ensure your laptop is connected to the oncampus MCLA network, preferably Eduroam.
- 2. Navigate to System Preferences > Printers and Scanners.
- 3. Click the ‘retry’ icon under the Printers List. The Add dialog is displayed. It displays a list of all of the discovered printers on the network.
- 4. Select a "BlazerPrint' printer that uses the Bonjour protocol.
- 5. At the bottom of the dialog box, check that Use is set to Secure AirPrint.
- Note: If Secure AirPrint isn’t displayed, close the add dialog then disconnect from the network. Reconnect to it again.
- 6. Click Add.
- 7. Print your document. When prompted, enter your MCLA A number and password.
For IOS Users (Iphone/Ipad):
- 1. Open the app you want to print from and tap the share icon:
- Scroll down and tap
![]() or
Print.
No print option? Check the app's User Guide or Help - not all apps support printing.
or
Print.
No print option? Check the app's User Guide or Help - not all apps support printing.
Select a printer. Select the number of copies and other options, like which pages you want to print. Tap Print in the top-right corner. If you're prompted, enter your MCLA A number and password.
